Virtualization Errors
This guide covers common virtualization-related errors and their solutions.
VMX/SVM Not Supported Error
VMX/SVM is not supported
Video Tutorial
Solution Steps
-
Disable Windows Virtualization Features
- Open Control Panel
- Navigate to "Programs and Functions"
- Click "Turn Windows features on or off"
- Disable these features:
- Virtual Machine Platform
- Hyper-V
-
Disable Hypervisor (if Step 1 doesn't work)
- Open Command Prompt as Administrator
- Run the following command:
bcdedit /set hypervisorlaunchtype off - Restart your computer
-
Windows 11 Specific Solution ( OR UNIVERSAL BUT BE CAREFUL CAN DESTORY PC)
- If the above methods don't work, try this:
- Open PowerShell as Administrator
- Run these commands:
takeown /F "C:\Windows\System32\hvix64.exe"
icacls "C:\Windows\System32\hvix64.exe" /grant *$(([System.Security.Principal.WindowsIdentity]::GetCurrent()).User.Value):F
takeown /F "C:\Windows\System32\hvax64.exe"
icacls "C:\Windows\System32\hvax64.exe" /grant *$(([System.Security.Principal.WindowsIdentity]::GetCurrent()).User.Value):F
del "C:\Windows\System32\hvix64.exe"
del "C:\Windows\System32\hvax64.exe"
The Windows 11 solution involves deleting system files. Make sure you have a backup before proceeding with this step.
How to Enable/Disable Hyper-V
Steps:
-
Open Windows Features:
- Press Windows Key + R to open the Run dialog.
- Type
optionalfeaturesand press Enter (or click OK). - This opens the "Turn Windows features on or off" window.
-
Enable Hyper-V:
- Scroll down and locate Hyper-V in the list.
- Check the box next to it to enable all Hyper-V components (including Hyper-V Management Tools and Hyper-V Platform).
- Click OK to apply the changes.
-
Restart Your Computer:
- Windows will prompt you to restart.
- Save your work and click Restart now to complete the installation.
- After the restart, Hyper-V will be fully enabled and ready to use.
BIOS Virtualization Error
Please enable Intel VT-X/AMD-V in the BIOS
Solution Steps
-
Enter BIOS
- Restart your computer
- During startup, press the BIOS key (usually Del, F2, F10, or F12)
- Key varies by manufacturer:
- Dell: F2 or F12
- HP: F10
- Lenovo: F1 or F2
- ASUS: Del or F2
- Acer: F2 or Delete
-
Enable Virtualization
- Look for one of these options (name varies by manufacturer):
- "Intel Virtualization Technology"
- "Intel VT-X"
- "AMD-V"
- "SVM Mode"
- "Virtualization Technology"
- Enable the option
- Save changes and exit BIOS
- Restart your computer
- Look for one of these options (name varies by manufacturer):
If you can't find the virtualization option, check under:
- Advanced Settings
- CPU Configuration
- System Configuration
- Security
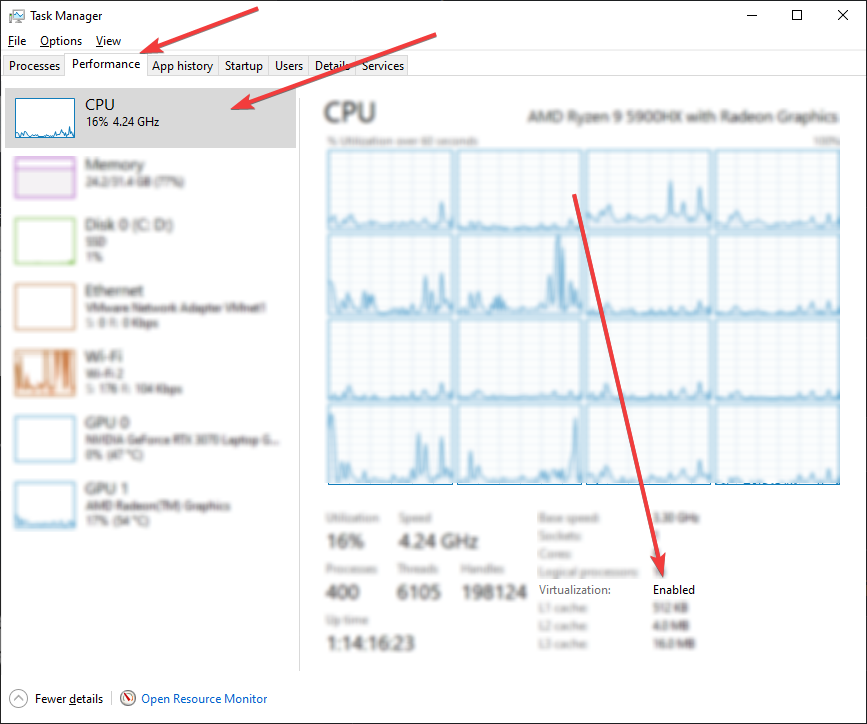
Verifying Virtualization Status
You can verify if virtualization is properly enabled:
- Using Task Manager
- Press Ctrl + Shift + Esc
- Go to Performance tab
- Look for "Virtualization" at the bottom
- Using System Information
- Press Win + R
- Type
msinfo32and press Enter - Under System Summary, look for:
- "Hyper-V Requirements"
- "Virtualization Enabled In Firmware"
Both methods should show virtualization as enabled after applying the solutions above.
Error: "Please make sure PIN is not set and manually disable Hyper-V"
- Disable PIN and Password
- Remove Windows Hello PIN.
- Disable any Windows Hello sign-in requirements.
- Disable Virtualization in BIOS
- Restart your computer and enter the BIOS/UEFI menu.
- Locate the virtualization setting (Intel VT-x / AMD-V).
- Disable it and save changes.
- Delete Hyper-V Related Files Open Command Prompt as Administrator and run:
del "C:\Windows\System32\hvix64.exe"
del "C:\Windows\System32\hvax64.exe"
- Enable Virtualization
- After completing the previous steps, return to BIOS/UEFI.
- Re-enable Intel VT-x or AMD-V virtualization.
- Save and reboot.
Common Issues
- Virtualization Conflicts: Some antivirus software may conflict with virtualization. Temporarily disable your antivirus if issues persist.
- Windows Updates: Recent Windows updates might re-enable Hyper-V. Repeat the solution steps if necessary.
- BIOS Updates: In rare cases, updating your BIOS might reset virtualization settings.
For additional support, consult your motherboard or computer manufacturer's documentation.